
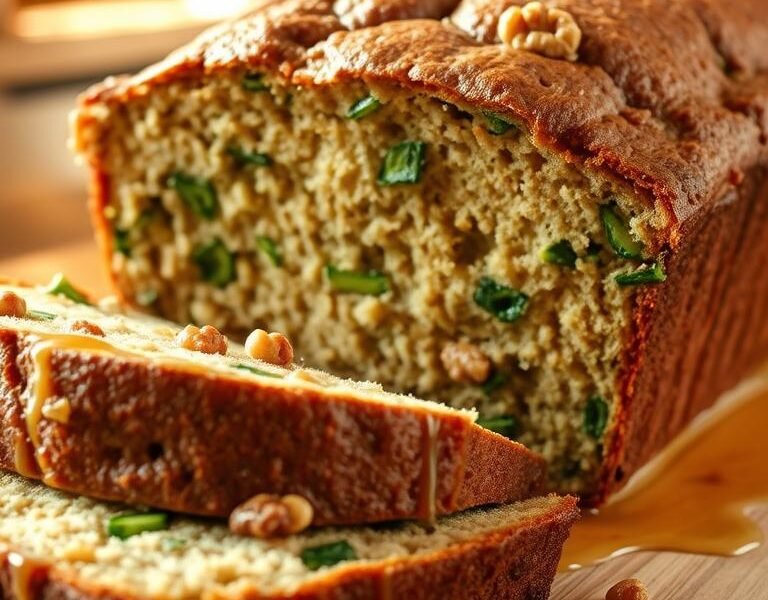
Want fresh-baked zucchini bread but don’t have much time? This no knead bread recipe makes it easy. It mixes zucchini with simple ingredients. It’s perfect for busy mornings or weekend baking.
This zucchini bread is ready in hours, not days. Start by mixing warm milk, sugar, yeast, and olive oil in a bowl. Let it rest for 10 minutes until it’s bubbly. Then, blend in flour and shredded zucchini. No messy kneading needed!
Our guide shows you how to make this bread recipe. It’s great for beginners because it’s quick and keeps flavors rich. Zucchini makes each slice sweet and moist.
Follow along to see how simple ingredients become a hit in your kitchen.
Why You’ll Love This Easy No-Knead Zucchini Bread
Ready to find a simple recipe that’s full of flavor? This no-knead zucchini bread is easy and delicious. It’s great for those who want homemade bread but don’t have much time or skill. 
The Perfect Bread for Beginners
No fancy moves or expensive tools needed. The no-knead method makes shaping easy. Even beginners can make this bread. Just mix, wait, and watch it rise—no need for special tools.
Health Benefits of Adding Zucchini to Your Bread
Zucchini adds moisture and fiber, reducing the need for extra fat. Each slice is full of vitamins A and C. Almond milk makes it vegan, and olive oil adds richness without extra calories.
Time-Saving Benefits of No-Knead Method
Save time by cutting prep in half. Mix warm milk, olive oil, sugar, and yeast first. Then add zucchini and flour. Let it rise while you do other things. Most ingredients like flour and yeast are probably in your pantry.
The Science Behind No-Knead Bread Recipes
Ever wondered how no-knead bread recipes work their magic? The secret lies in chemistry and time. This method uses natural processes to create soft, airy loaves. Let’s break it down:
Start by activating yeast. Mixing it with warm water and sugar wakes it up. Letting it sit for 10 minutes until foamy ensures yeast is ready to produce carbon dioxide—the gas that makes your bread rise. This step is key in every no knead bread recipe.

Next, time takes over. High hydration dough (wet and sticky) looks messy at first, but patience pays off. Enzymes in flour slowly break down proteins into gluten strands. This process, called autolysis, builds dough structure naturally. No arm-kneading required!
During fermentation, time works like a timer. A 12–18 hour rise allows gluten to develop fully. The longer wait creates better texture than rushed kneading. Here’s how it stacks up:
- Yeast Activation: Foamy mixture = active bubbles for lift
- Gluten Development: Enzymes form stretchy networks without hands-on work
- Hydration: Wet dough traps gas, leading to airy crumb
Science makes it simple. Follow these steps, and your bread recipe transforms from a shaggy mess into a tender loaf. Trust the process—your kitchen lab is now a gluten-forming powerhouse!
Essential Ingredients for Perfect Zucchini Bread
Every part of your zucchini bread matters for taste and texture. Let’s look at what you need to make it perfect.

Understanding Flour Options and Protein Content
Begin with 3 cups (420g) of strong bread flour (13% protein) for a good structure. This type of flour makes the bread sturdy. If you use diy bread with all-purpose flour, you might need to adjust the rising time a bit.
Always add 1 tsp salt. It helps balance the flavors and keeps the yeast working right. For gluten-free zucchini bread, use a gluten-free bread flour blend.
- Bread Flour: Ideal for no-knead bread (13% protein)
- All-Purpose Flour: Use 10% less water
- Gluten-Free Flour: Follow package instructions for adjustments
Fresh vs. Dried Yeast Considerations
Decide on yeast based on what you have. Here’s a comparison:
| Type | Best For | Conversion Guide |
|---|---|---|
| Instant Yeast | No-Knead bread | 1:1 substitution for active dry |
| Active Dry | Cold environments | Rehydrate in warm water first |
| Fresh Yeast | Professional bakers | 1 cake ≈ 2¼ tsp dry yeast |
Properly Preparing Your Zucchini
Follow these steps for the best results:
- Grate ½ cup (60g) of zucchini into a bowl.
- Squeeze out excess moisture with a clean towel—this prevents a soggy crumb.
- Measure precisely to avoid altering the batter’s balance.
Tip: Use a box grater for even texture. If you skip squeezing moisture, your zucchini bread may become dense.
Kitchen Tools You’ll Need
Making no-knead bread is easy with just a few tools. Here’s what you need to make zucchini bread perfectly:
| Tool | Purpose | Budget-Friendly Option |
|---|---|---|
| LARGE MIXING BOWL | Holds dough during mixing and rise | Casserole dish or clean bucket |
| LOAF PAN (9×5 INCHES) | Bakes dough into a classic shape | Parchment-lined baking sheet |
| KITCHEN SCALE | Ensures accurate measurements | Measuring cups (less precise) |
| GRATER | Prep zucchini for even texture | Box grater or food processor |

You’ll also need a spoon or spatula for mixing. A clean towel or plastic wrap covers the bowl. A thermometer checks no knead bread doneness, but it’s optional.
Most tools are probably in your kitchen already. A diy bread mindset means being creative! Use what you have, like a butter knife instead of a spatula. Every tool has a simple alternative to save money.
Step-by-Step Preparation Guide
Follow this simple process to craft your no knead bread recipe masterpiece. Each stage requires patience and attention to achieve the perfect crumb.
Mixing Your Wet Ingredients
Start by warming milk to 110°F (43°C)—never hotter or cooler. Mix it with sugar, yeast, and olive oil in a bowl. Let it sit for 10 minutes until it’s bubbly.
This proves the yeast is active. It’s a key step in every zucchini bread success.
Incorporating Dry Ingredients and Zucchini
Slowly add flour and salt until a shaggy dough forms. Fold in 1.5 cups of shredded zucchini (dried first). Stop mixing once everything is combined.
The sticky texture means your bread recipe is on track. Overmixing can make it dense.
First Rise: What to Look For
Cover the bowl with a damp towel. Let it rise in a warm spot (75-80°F) until doubled, usually 1-2 hours. Look for a puffy surface with bubbly pockets.
If rising slows, try placing the bowl near an oven that’s been warmed then turned off.
Shaping and Second Rise
Gently scrape the dough into a greased loaf pan. Use wet hands to shape into a smooth top. Let it rise again for 30-45 minutes until it springs back slightly when touched.
This second rise ensures maximum rise without overproving.
Baking Your No-Knead Zucchini Bread to Perfection
Mastering the final steps ensures your no knead bread shines. Follow these guidelines for a moist, flavorful loaf:
Temperature Guidelines
Preheat your oven to 180°C (350°F). This temperature balances browning and doneness. Bake for 30–35 minutes—avoid opening the oven early to prevent uneven rising.
Visual Cues for Doneness
- Golden crust: Edges should turn deep golden brown.
- Internal test: Insert a toothpick—it should come out clean.
- Snap test: The center will spring back when lightly pressed.
Cooling and Storing Properly
Cool bread on a wire rack for at least 20 minutes before slicing. Here’s how to store it:
| Storage Method | Time Frame | Best Practices |
|---|---|---|
| Room Temperature | 3–4 days | Airtight container at cool room temp |
| Refrigeration | 5–7 days | Wrap tightly in plastic wrap or foil |
| Freezing | 3 months | Seal in freezer bags, thaw at room temperature |
Pro tip: Letting your bread cool fully prevents a soggy texture. Store in a cool, dry place to maintain freshness without plastic wrap.
Troubleshooting Common Issues
Even with the simplest no knead bread methods, challenges can arise. Let’s address the most frequent issues to keep your diy bread efforts on track.
If your bread recipe dough feels too wet, start by checking your flour measurement. Use a spoon-and-level method for 3 cups of flour to avoid packing. Excess moisture in zucchini? Squeeze it thoroughly until it releases liquid. For dough that’s too dry, add water 1 tablespoon at a time.
Struggling with rising? First, confirm your yeast is fresh—old yeast won’t activate properly. Let the dough rise in a warm, draft-free spot (75-80°F). If your bread collapses mid-bake, it may be overproofed. Test doneness by tapping the bottom—it should sound hollow. Overly dense texture often comes from rushed rising or inaccurate flour measurements. Always use a kitchen scale for precise flour weighing.
- Crust issues: A soggy crust usually means excess moisture from under-squeezed zucchini. For cracked tops, try covering the loaf with foil during the last 10 minutes of baking.
- Uneven rising: Ensure zucchini is finely shredded and evenly distributed throughout the batter. Clumps can create air pockets.
- Overly sweet results: Reduce sugar by 1-2 tablespoons if using very sweet zucchini varieties.
When adjusting, remember to tweak one variable at a time. Keeping a baking journal helps track changes. Environmental factors like high humidity? Reduce liquid by 2 tablespoons next try. Altitude adjustments? Decrease yeast by ½ teaspoon above 3,000 feet. Small tweaks turn mistakes into learning moments!
Delicious Variations to Try
Make your no-knead zucchini bread even better with these fun changes. Want something crunchy, sweet, or gluten-free? These ideas will make every loaf special.
Adding Nuts and Seeds
- Stir in 1/2 cup chopped walnuts or pecans for texture.
- Toast sunflower or flaxseeds before mixing for deeper flavor.
- Try chia seeds for a nutrient boost without altering the recipe’s structure.
Sweet and Savory Options
Change flavors to fit any meal:
- Sweet: Add 1/2 tsp vanilla or 1/4 cup dark chocolate chips.
- Savory: Mix in garlic powder, shredded cheese, or rosemary for a sandwich bread base.
- Balance additions: Keep total mix volume consistent to avoid sinking.
Gluten-Free Adaptations
Use Bob’s Red Mill 1:1 Gluten-Free Baking Flour and add 1/2 tsp xanthan gum. Follow the same no-knead steps, but check for doneness at 30 minutes. Let it cool fully before slicing to prevent crumbling.
Start small—add one ingredient at a time—to master the original recipe first. Bake until golden brown and enjoy endless possibilities!
Serving Suggestions for Your Homemade Bread
Make your fresh-baked zucchini bread a daily favorite. Its moist texture and mild taste are great for any meal. You can mix it into meals or enjoy it with a spread.
| Meal | Idea |
|---|---|
| Breakfast | Top toasted slices with nut butter or eggs |
| Lunch | Layer turkey and cheese for a hearty sandwich |
| Dinner | Serve with roasted vegetables or soups |
Breakfast Ideas
Start mornings right with these options:
- Toast and spread with peanut butter or jam.
- Cut into cubes for a yogurt parfait base.
- Soak in milk and spices to make French toast.
Lunch Pairings
Boost your midday meals by:
- Making BLTs or veggie wraps with sandwich bread.
- Pair with soups like tomato or minestrone.
- Include in a platter with cheeses and fruit.
Dinner Accompaniments
Elevate evening meals with these tips:
- Serve as a side for pasta or grilled meats.
- Drizzle with olive oil and herbs as a dipper.
- Crumble into salads for added texture.
Nutritional Information and Benefits
Each slice of this zucchini bread is packed with good stuff. It has ½ cup zucchini (with moisture removed) and 2 tbsp olive oil. These add vitamins and fiber to your diet.
- Vitamins A and C: Helps keep your immune system strong and your skin healthy
- 2g fiber to help with digestion
- Heart-healthy fats from olive oil
This bread has 150 calories per slice. That’s more than white bread but with extra nutrients. Enjoy one slice as part of a balanced meal.
Allergens: contains wheat and nuts (if added). Swap flour for gluten-free or omit nuts for safety. Store leftovers in an airtight container.
With veggies and quality ingredients, every bite of this zucchini bread is a nutrient boost. It’s better than regular bread.
Make-Ahead and Freezing Instructions
Keeping your no knead bread fresh is simple. Discover how to store and revive your zucchini bread. This way, it stays moist and tasty for weeks or months.
Proper Wrapping Techniques
Let your zucchini bread cool down first. Here’s how to choose the best wrapping method:
- Plastic wrap: Wrap tightly for short-term storage (1–2 days) in the fridge.
- Aluminum foil: Keep it fresh in the fridge for 3–4 days by sealing edges tightly.
- Airtight containers or freezer bags: Use for freezing. Slice first if you want individual portions, then wrap each slice in foil before sealing.
Thawing and Refreshing Methods
| Method | Steps | Best For |
|---|---|---|
| Room Temperature Thaw | Unwrap and leave at room temp for 2–3 hours | Same-day use |
| Refrigerator Thaw | Unwrap and refrigerate overnight | Next-day use |
| Oven Refresh | Warm slices at 350°F for 5–10 minutes | Restoring crispness after thawing |
Freeze for up to 3 months. Always label containers with dates and contents. For ease, pre-slice before freezing and wrap individually. Proper storage makes your zucchini bread taste like it was just baked!
Conclusion: Enjoy Your Homemade Zucchini Bread Journey
Congratulations aren’t needed—you’ve already succeeded by following this no-knead bread recipe. Your DIY bread isn’t just a treat; it’s a gateway to simple, satisfying baking. This recipe proves that making bread at home doesn’t require hours of laborious kneading.
By using fresh zucchini and letting science do the work during rise times, you’ve created a moist, nutrient-packed loaf. It’s perfect for breakfast or snacks.
Remember key steps: grate zucchini finely, let dough rise until doubled, and bake until a toothpick comes out clean. These tips ensure every slice stays tender and flavorful.
Whether you opt for classic cinnamon or adventurous additions like walnuts or coconut, this bread recipe adapts to any craving. Share loaves with neighbors, or freeze extras for later—your kitchen can always be a source of warmth and comfort.
DIY bread baking rewards patience and creativity. As you experiment with gluten-free flours or savory toppings, keep this guide handy. The no-knead method simplifies every step, making it easy to turn seasonal produce into something special.
Whether for gifting or a quiet morning meal, this zucchini bread recipe keeps your baking skills growing with every batch. Happy baking—and don’t forget to savor each bite!